How to Create a Signature Canvas in iOS Using SwiftUI and PencilKit?
Creating a smooth and natural signature experience is a small feature that can add huge perceived value to an app—especially in business, productivity, and document-related products.
While building my invocing app Reckord, I recently added a Signature feature using Apple PencilKit. This post explains why digital signatures matter, introduces Apple PencilKit, and walks through how to build a custom signature canvas in SwiftUI step by step.
PencilKit
PencilKit is Apple’s native framework for handling handwriting, drawing, and annotations on iOS and iPadOS.
Although it’s often associated with sketching or note-taking apps, PencilKit is an excellent choice for building signature capture features.
Key benefits of using PencilKit:
- Smooth, low-latency drawing experience
- Native support for Apple Pencil and finger input
- Pressure and tilt sensitivity (Apple Pencil)
- High performance and battery efficiency
- Fully on-device and privacy-friendly
- Actively maintained and optimized by Apple
At the core of is PKCanvasView, a UIKit view that provides a ready-to-use drawing surface for capturing handwritten input.
What Does PencilKit Provide?
PencilKit offers a small but powerful set of APIs:
PKCanvasView– A drawing canvas for user inputPKDrawing– A data model representing the drawingPKToolPicker– Pencil, pen, eraser, and tool selection- Built-in support for exporting drawings as UIIMage, PDF, or Data
These components make it easy to build features like:
- Signature pads
- Handwritten notes
- Document annotations
- Markup tools
Using PencilKit in SwiftUI
PencilKit is built on UIKit, while many modern apps—including mine—are written in SwiftUI.
To use PencilKit inside SwiftUI, we rely on:
UIViewRepresentable
UIViewRepresentable allows us to wrap a UIKit view and embed it seamlessly inside a SwiftUI layout.
Using this approach, we can:
- Create and configure a
PKCanvasView - Manage its lifecycle
- Sync the drawing state with SwiftUI
- Keep the rest of the app fully SwiftUI-based
Step 1: Create a Signature Canvas Wrapper
The first step is to create a custom SwiftUI view that wraps PKCanvasView using UIViewRepresentable.
This wrapper is responsible for:
- Creating the canvas view
- Configuring drawing behavior
- Exposing the drawing data back to SwiftUI
Typically, this includes:
- Implementing
makeUIView()to initialize the canvas - Implementing
updateUIView()to keep state in sync - Using a
@Bindingto store the PKDrawing
import SwiftUI
import PencilKit

struct SignatureCanvasView: UIViewRepresentable {
    @SwiftUI.Environment(\.theme) var theme
    @Environment(\.colorScheme) var colorScheme
    @Binding var exportedImage: UIImage?
    @Binding var exportRequested: Bool
    @Binding var clearRequested: Bool
    @Binding var isCanvasEmpty: Bool

    func makeUIView(context: Context) -> PKCanvasView {
        let canvas = PKCanvasView(frame: .zero)
        canvas.overrideUserInterfaceStyle = .light
        canvas.drawingPolicy = .anyInput
        canvas.alwaysBounceVertical = false
        canvas.backgroundColor = .white
        canvas.isOpaque = true
        canvas.drawingPolicy = .anyInput
        canvas.tool = PKInkingTool(.pen, color: .black)

        context.coordinator.canvasView = canvas
        context.coordinator.canvasView?.delegate = context.coordinator
        return canvas
    }

    func updateUIView(_ uiView: PKCanvasView, context: Context) {
        uiView.overrideUserInterfaceStyle = .light
        uiView.tool = PKInkingTool(.pen, color: .black)
        // handle export request
        if exportRequested {
            // Export the whole canvas bounds (transparent background preserved)
            let lightTraits = UITraitCollection(userInterfaceStyle: .light)
            let scale = UIScreen.main.scale
            lightTraits.performAsCurrent {
                let bounds = uiView.drawing.bounds.insetBy(dx: -10, dy: -10) // small padding
                let drawingImage = uiView.drawing.image(from: bounds, scale: scale)
                DispatchQueue.main.async {
                    exportedImage = drawingImage
                    // reset flag
                    self.exportRequested = false
                }
            }
        }

        // handle clear request
        if clearRequested {
            uiView.drawing = PKDrawing() // reset drawing
            DispatchQueue.main.async {
                self.clearRequested = false
            }
        }
    }

    func makeCoordinator() -> Coordinator {
        Coordinator(isCanvasEmpty: $isCanvasEmpty)
    }

    class Coordinator: NSObject, PKCanvasViewDelegate {
        weak var canvasView: PKCanvasView?
        @Binding var isCanvasEmpty: Bool

        init(canvasView: PKCanvasView? = nil, isCanvasEmpty: Binding<Bool>) {
            self.canvasView = canvasView
            self._isCanvasEmpty = isCanvasEmpty
        }

        func canvasViewDrawingDidChange(_ canvasView: PKCanvasView) {
            isCanvasEmpty = canvasView.drawing.strokes.isEmpty
        }
    }

}
Step 2: Configure the PencilKit Canvas
Inside the UIKit view setup, you configure how the signature behaves.
Common configuration includes:
- Allowing both finger and Apple Pencil input
- Setting a clear or white background
- Enabling or disabling scrolling
- Choosing the default drawing tool
- Optionally displaying the tool picker
let canvas = PKCanvasView(frame: .zero)
canvas.overrideUserInterfaceStyle = .light // light, dark
canvas.drawingPolicy = .anyInput // default, anyInput, pencilOnly
canvas.alwaysBounceVertical = false
canvas.backgroundColor = .white
canvas.isOpaque = true
canvas.tool = PKInkingTool(.pen, color: .black)
These settings ensure the signature feels natural and distraction-free.
Step 3: Integrate the Signature Canvas into SwiftUI
Once the wrapper is ready, you can use it like any other SwiftUI view.
At this stage, you can:
- Embed it inside a
VStackorForm - Control its height and layout
- Add actions like Clear, Save, or Done
- React to drawing updates using bindings
This makes the signature feature feel fully native within your SwiftUI app.
VStack {
Spacer()
ZStack {
// Visual border to show area
RoundedRectangle(cornerRadius: theme.spacing.sm)
.stroke(style: StrokeStyle(lineWidth: 1, dash: [6])) // dashed border
.foregroundColor(theme.colors.tint)
// The PencilKit canvas
SignatureCanvasView(
exportedImage: $exportedImage,
exportRequested: $exportRequested,
clearRequested: $clearRequested,
isCanvasEmpty: $isCanvasEmpty
)
.clipShape(RoundedRectangle(cornerRadius: theme.spacing.sm))
.padding(theme.spacing.xs)
.onChange(of: store.exportedImage) { oldValue, newValue in
if let image = newValue, let imageData = image.pngData() {
//USE imageData TO DISPLAY IMAGE ON VIEW
}
}
}
.frame(height: 220)
Spacer()
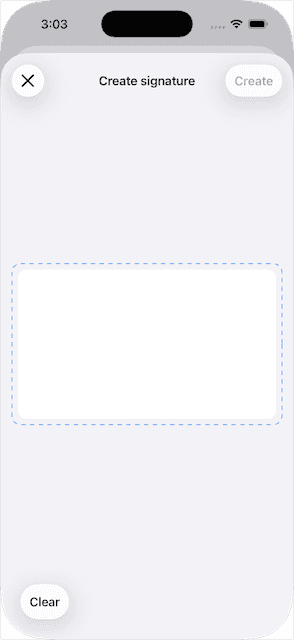
}Output:
Step 4: Extract and Use the Signature Output
After the user finishes signing, the captured PKDrawing can be:
- Converted into a
UIImage - Exported as a PNG or PDF
- Stored locally or uploaded
- Attached to invoices, documents, or records
This step turns a visual signature into something usable in real-world workflows.
.onChange(of: store.exportedImage) { oldValue, newValue in
    if let image = newValue, let imageData = image.pngData() {
        //USE imageData TO DISPLAY IMAGE ON VIEW
    }
}
Final Result
By combining PencilKit with SwiftUI, you get:
- A smooth, responsive signature experience
- Support for Apple Pencil and finger input
- Clean separation between UI and data
- A future-proof, Apple-maintained solution
This is the exact approach I used to implement the signature feature in Reckord, and it works great. Here is output:
Closing Thoughts
Signature capture might seem like a small feature, but when implemented well, it adds significant trust and professionalism to an app.
With SwiftUI + PencilKit, you can deliver a high-quality signature experience using native tools with minimal complexity.
Thank you for reading! 😀 Stay safe and take care!
If you have any suggestions or a better approach, feel free to connect with me on X and send me a DM. If you enjoyed this article and would like to support me, Buy me a coffee.